Traefix 简介
Traefik 是整个系统的网关大门,负责拦截并路由每个传入的请求,它不需要像Nginx这类反向代理一样需要一个配置文件来配置所有可能路由,而是实时的通过服务发现来自动更新路由规则,由服务自己告诉它该服务负责处理哪些请求。
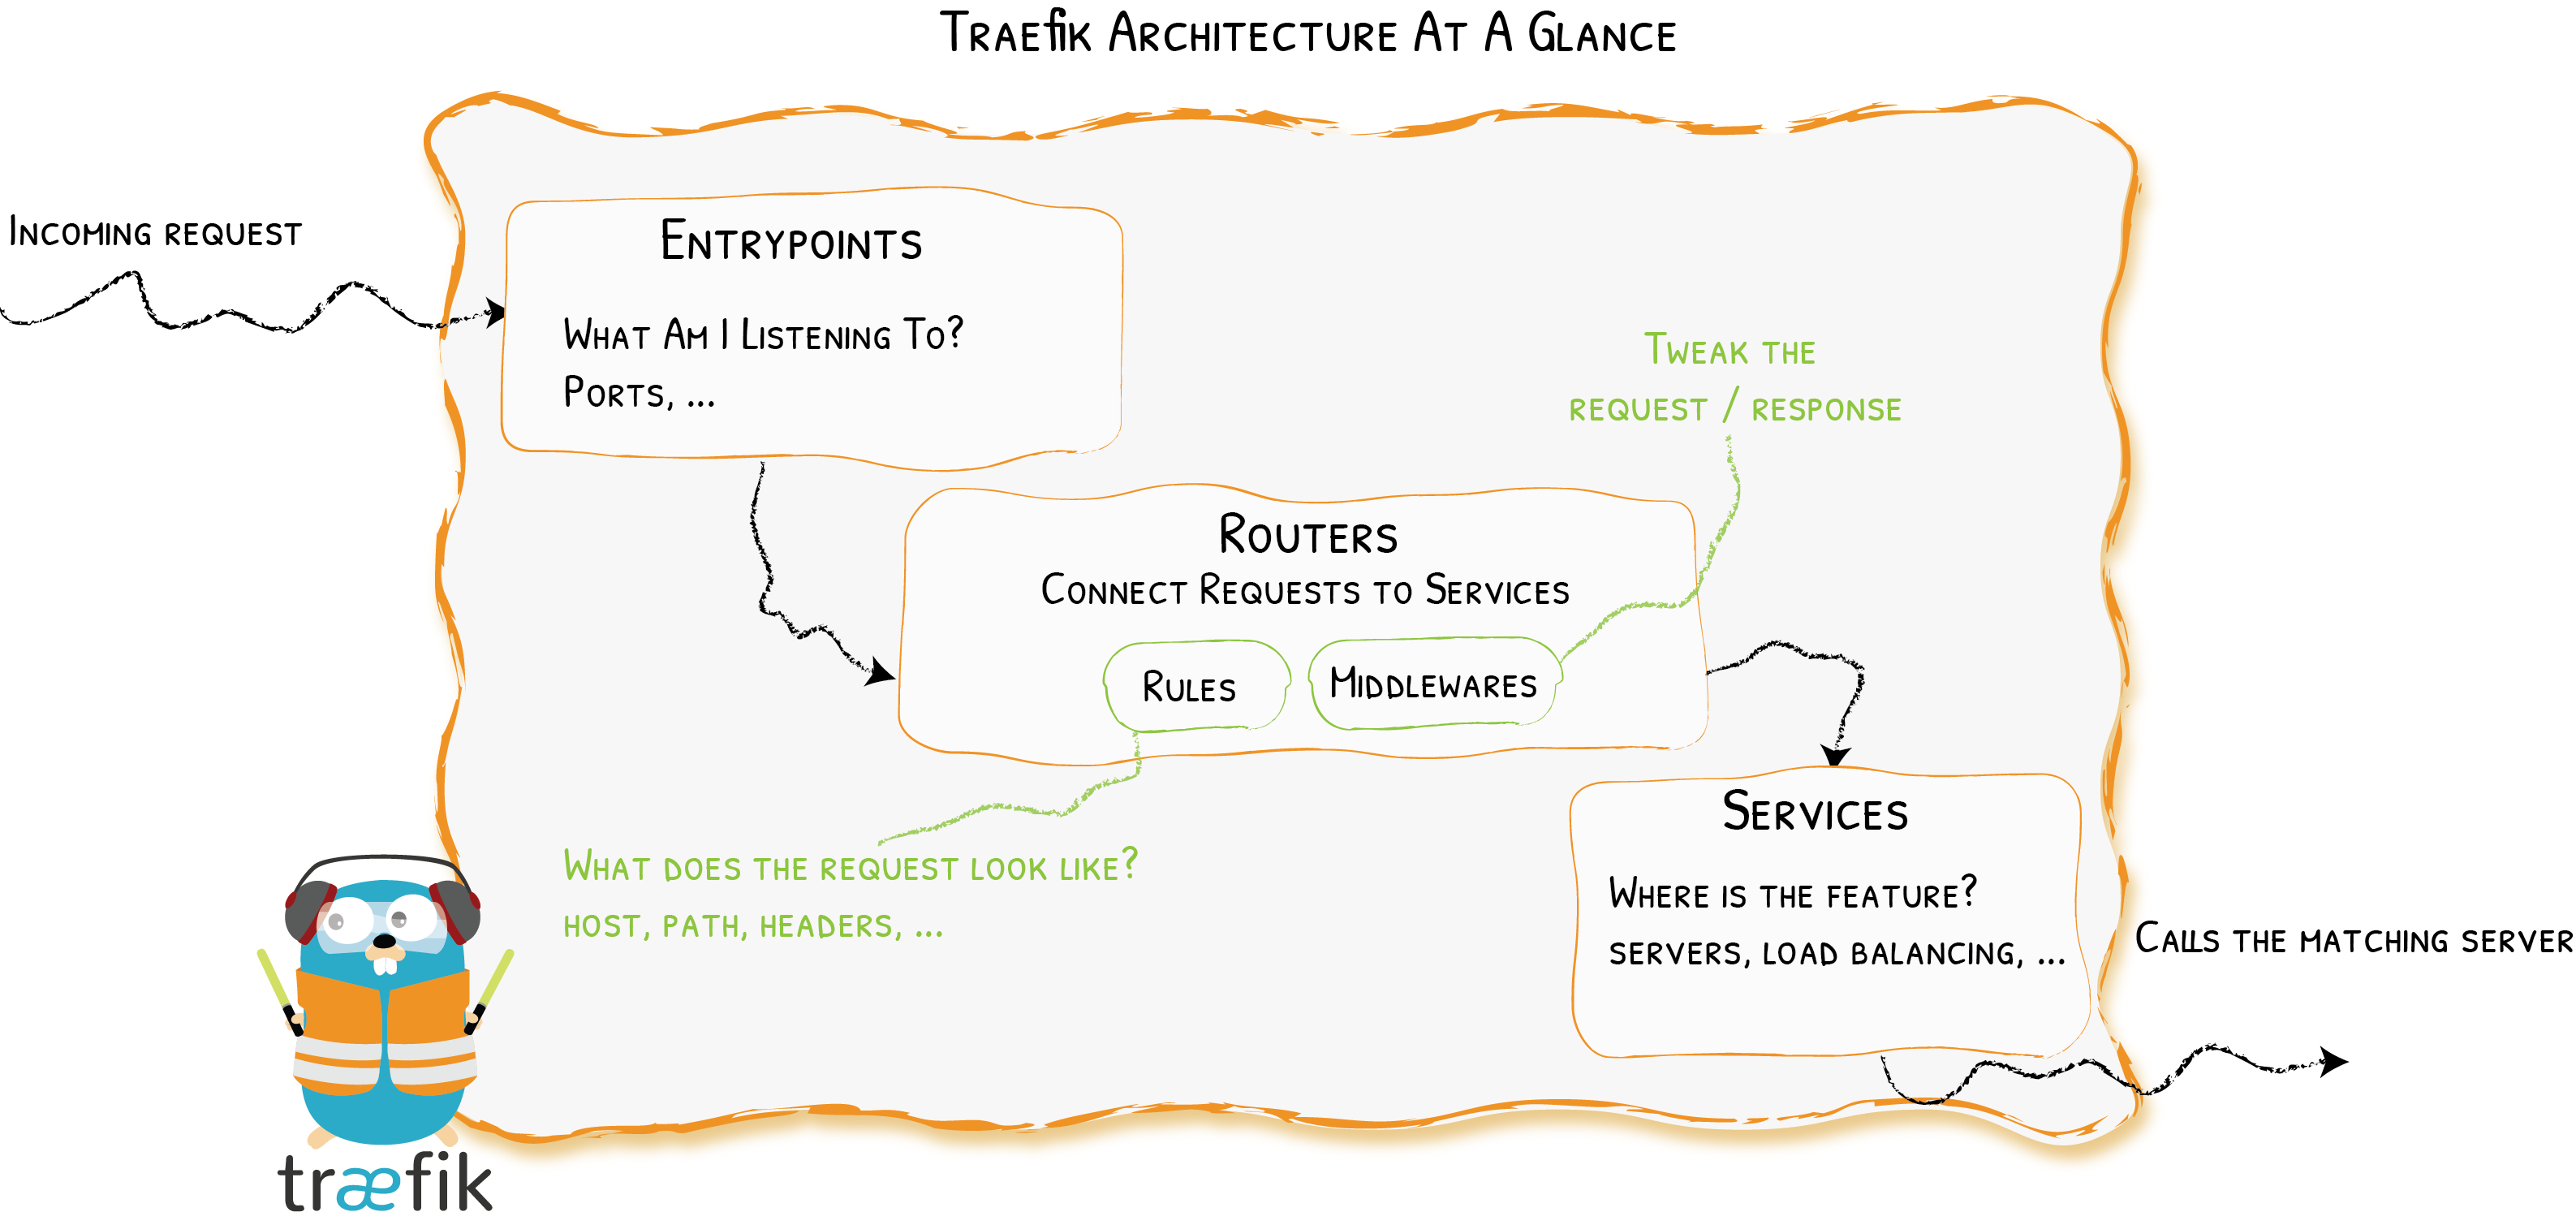
Traefik 的架构设计:
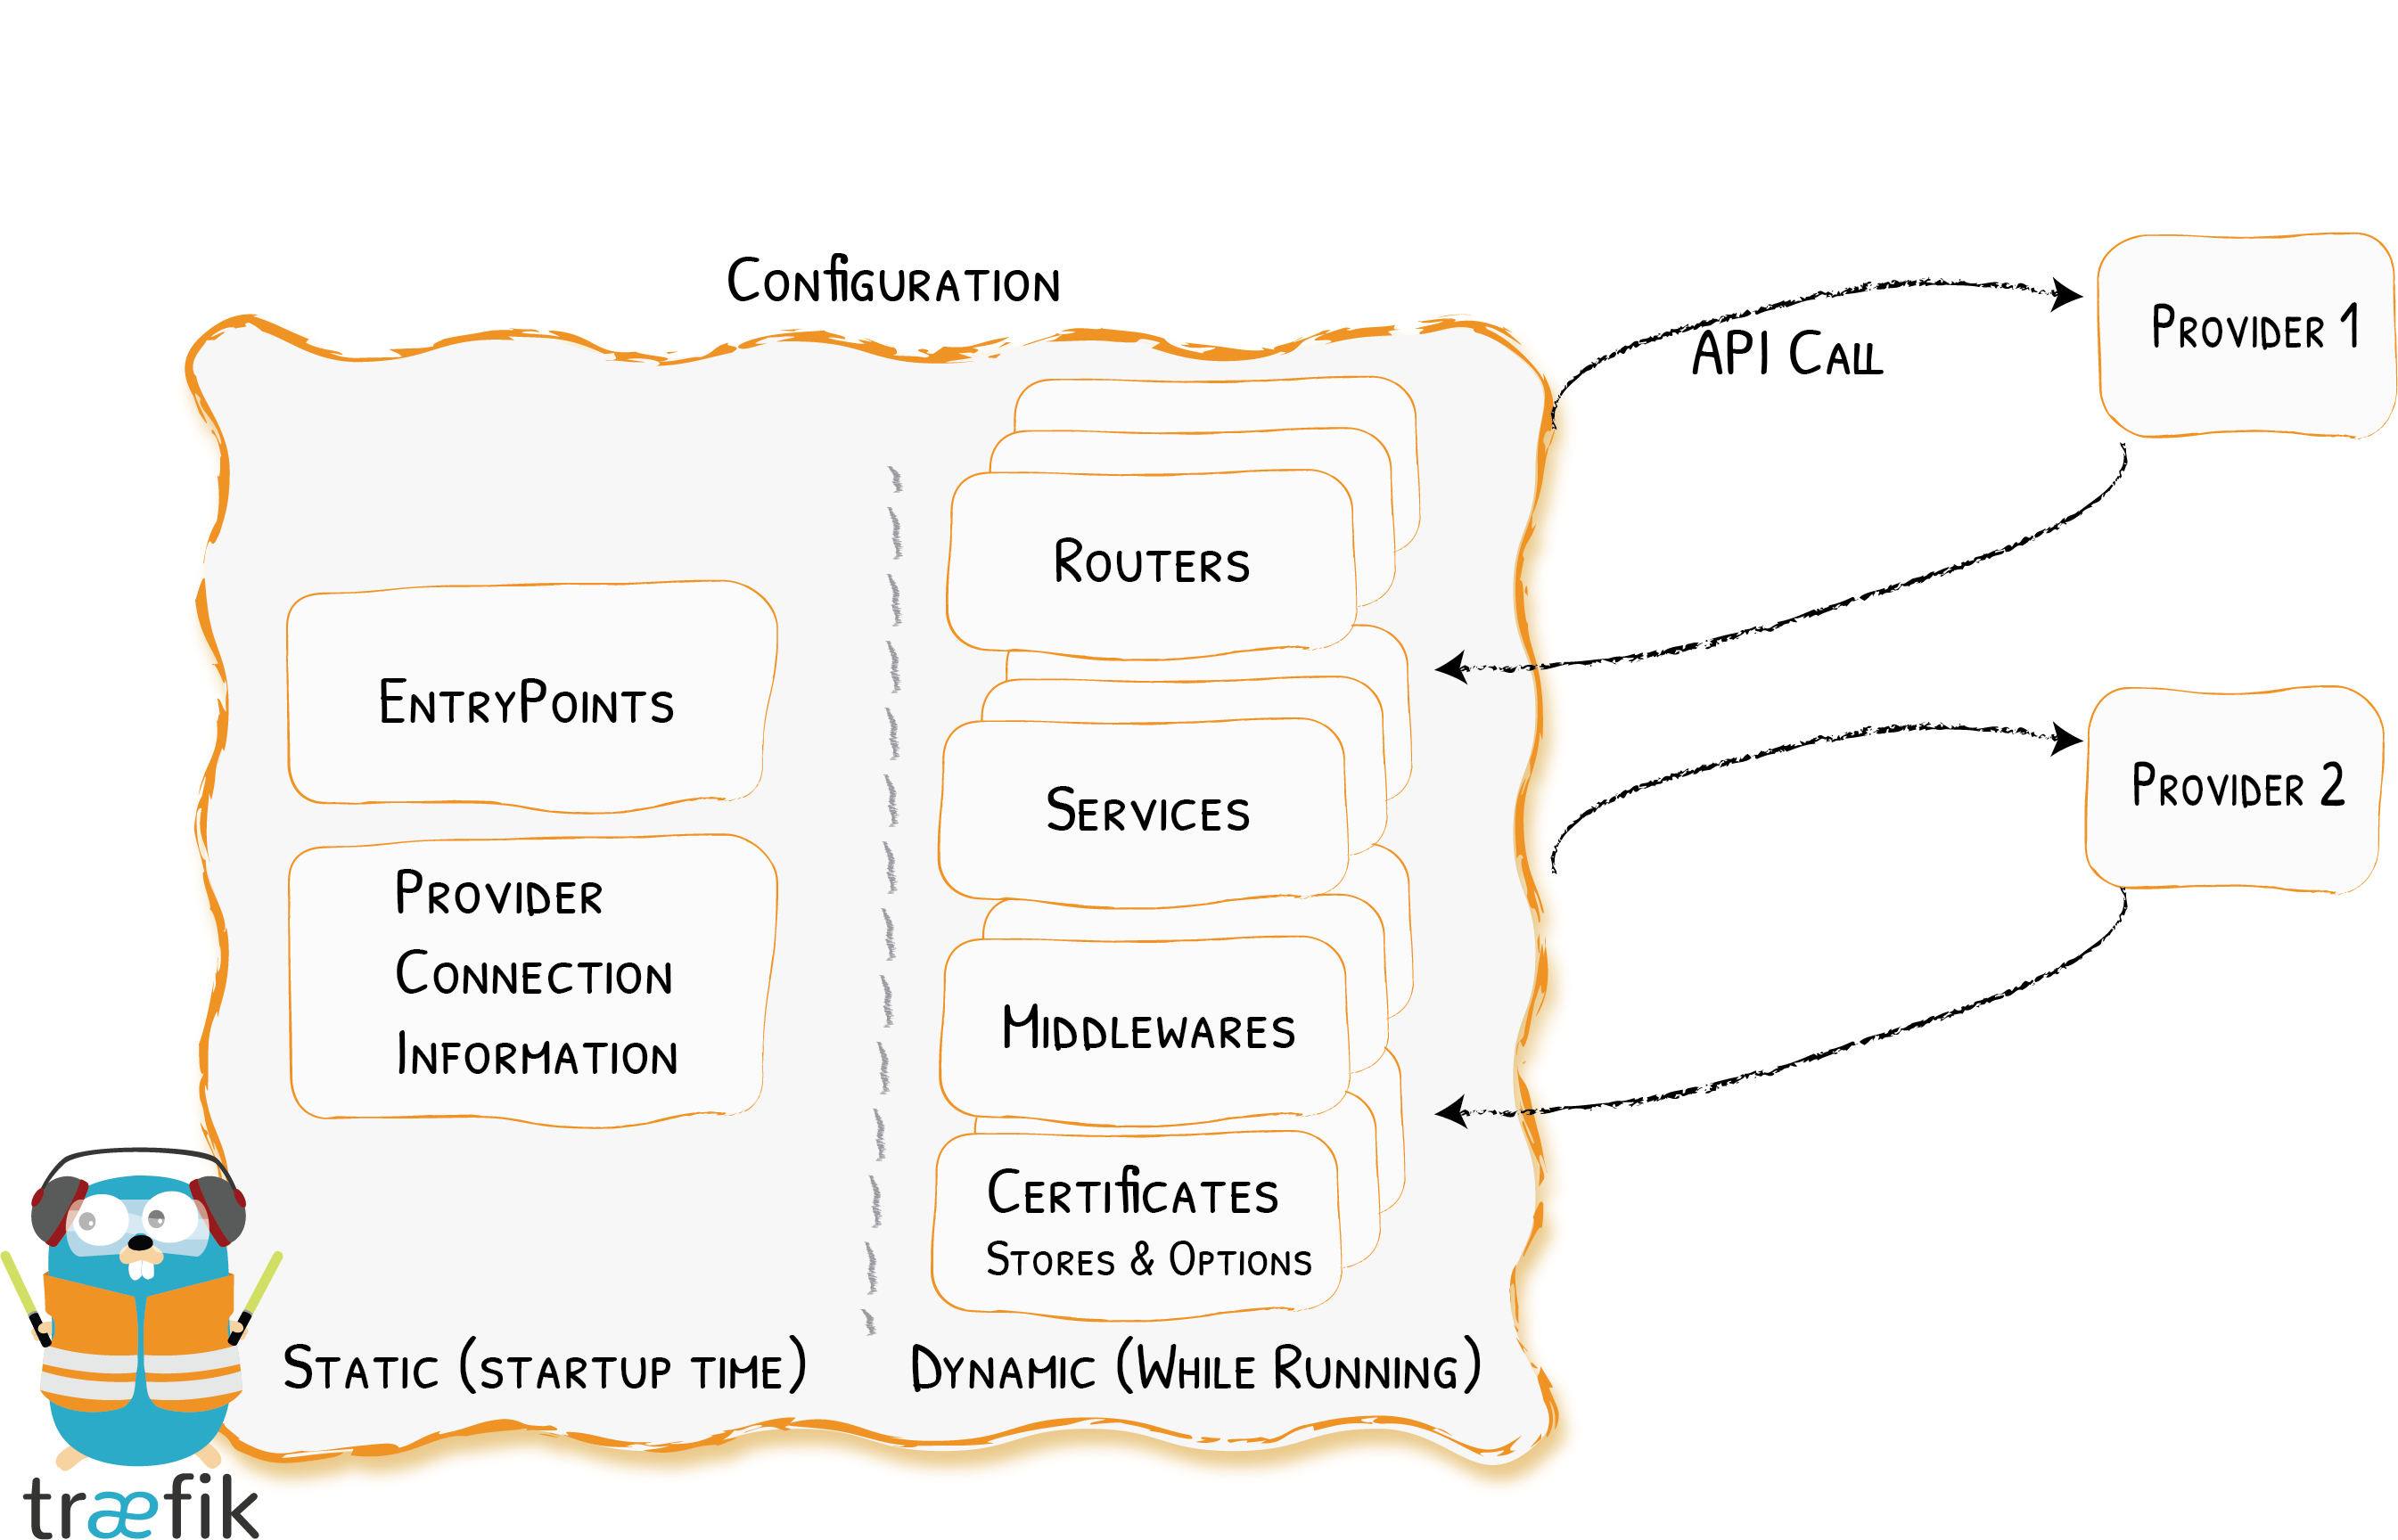
Traefik 服务配置自动发现原理
Traefik 的配置分为静态配置和动态配置,静态配置是 Traefik 实例的启动配置; 动态配置由 Provider 自己提供,这里包含了定义系统如何处理请求的所有内容,此配置可以被无缝热加载。
Traefik 各组件功能:
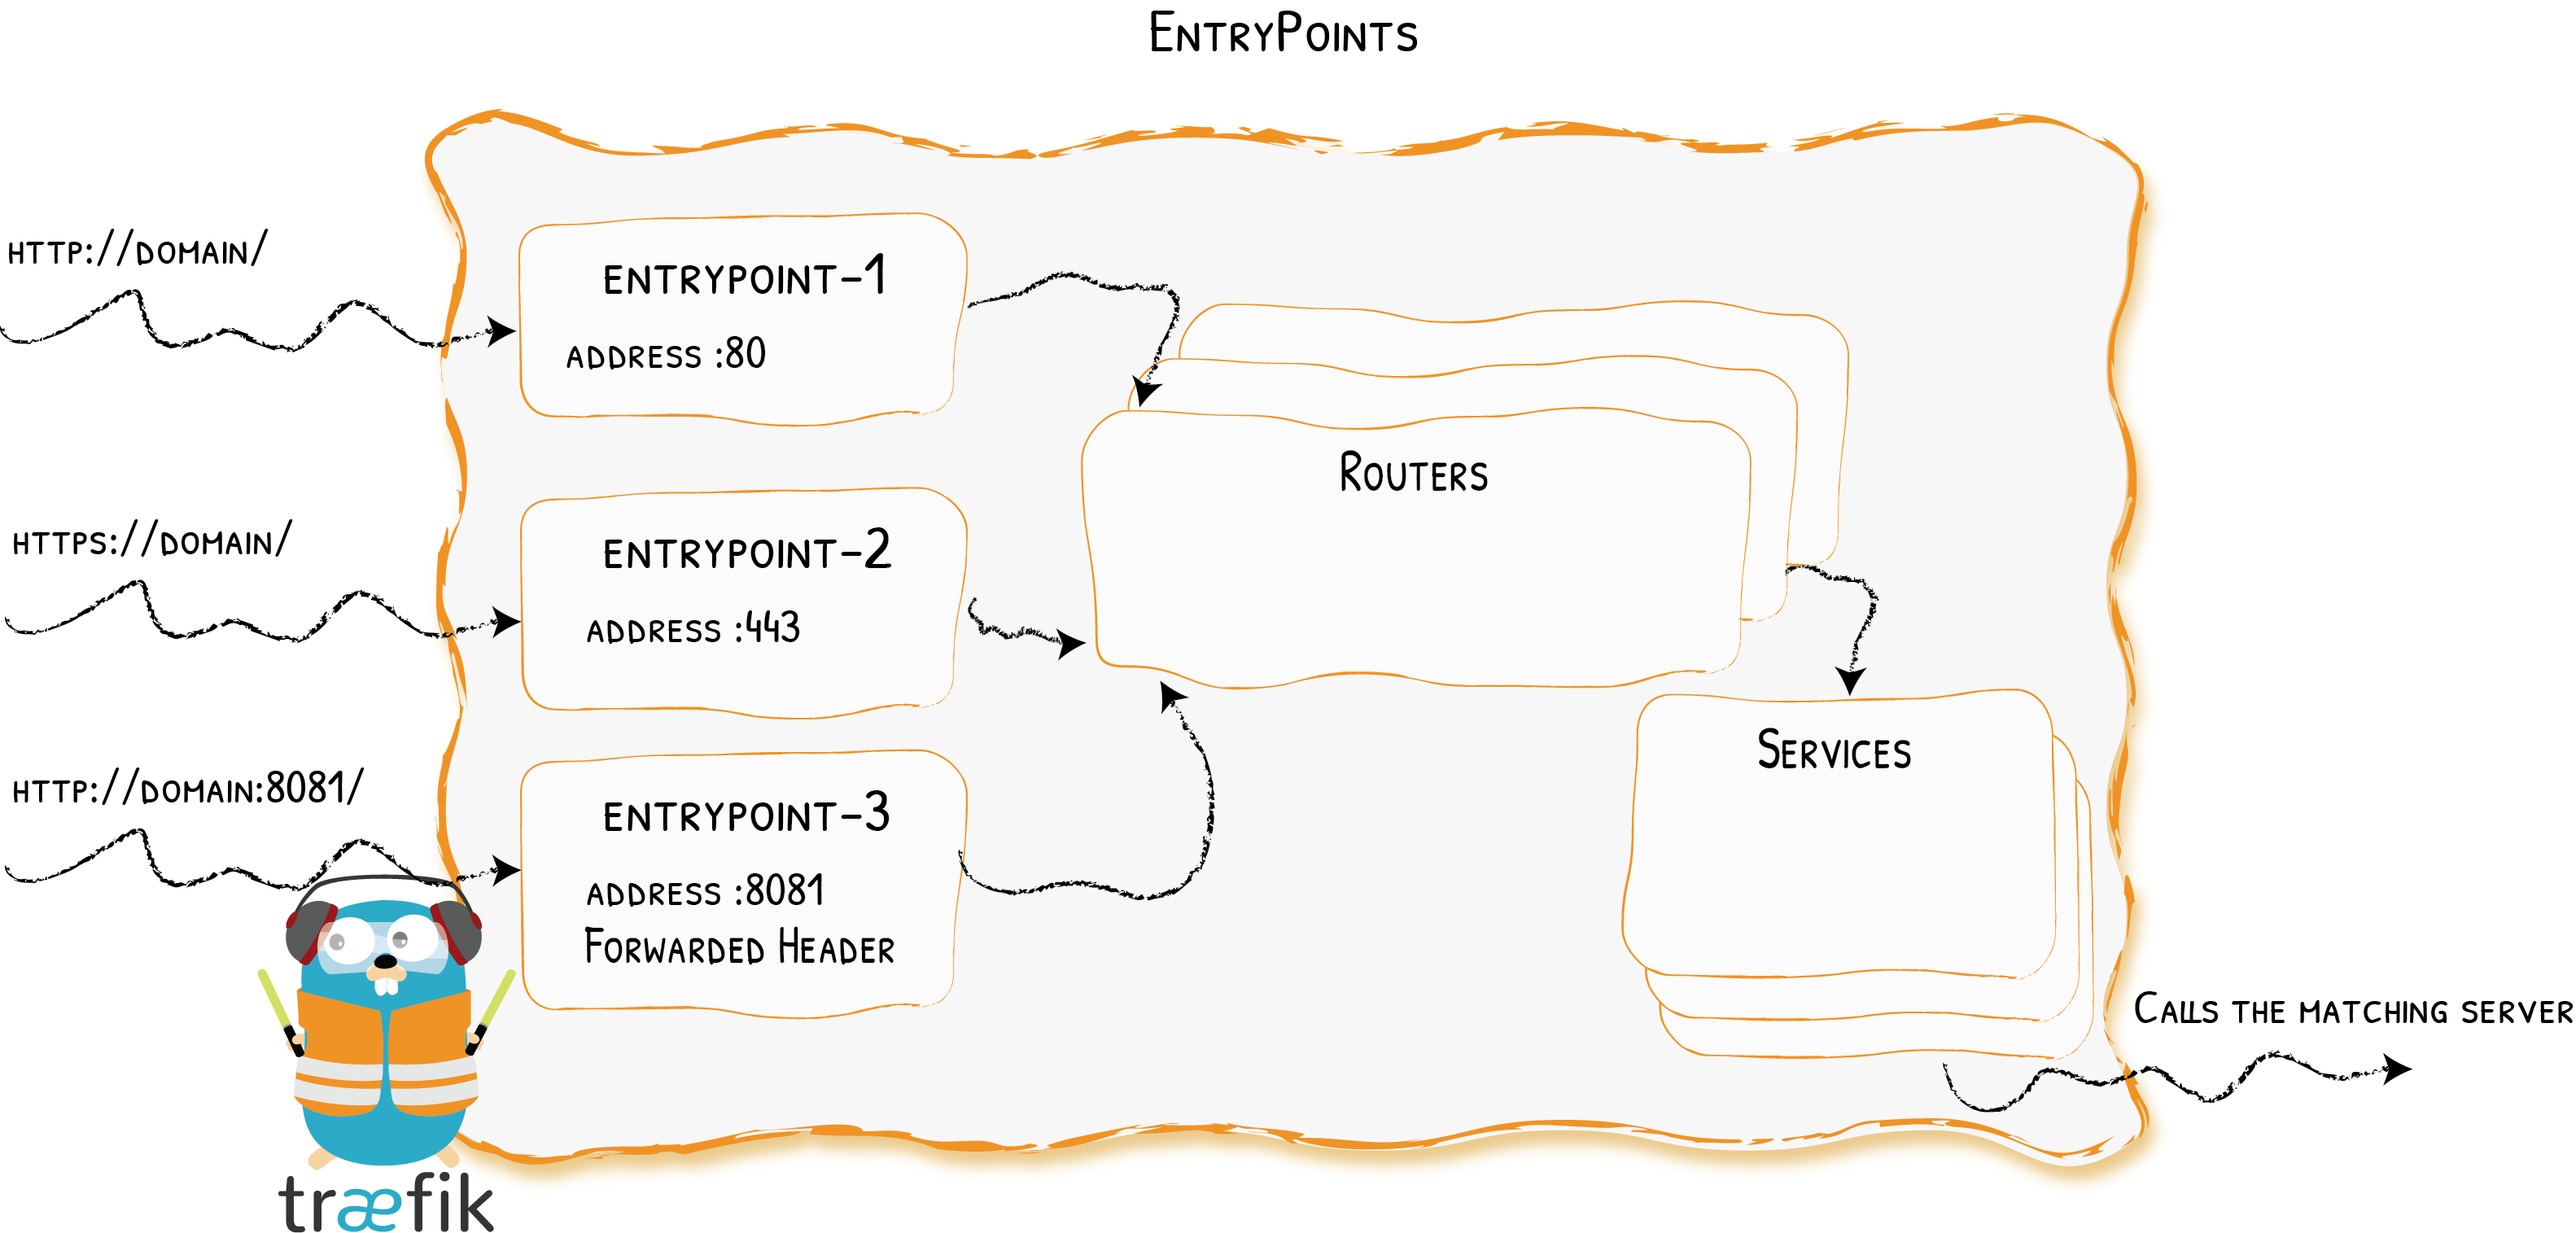
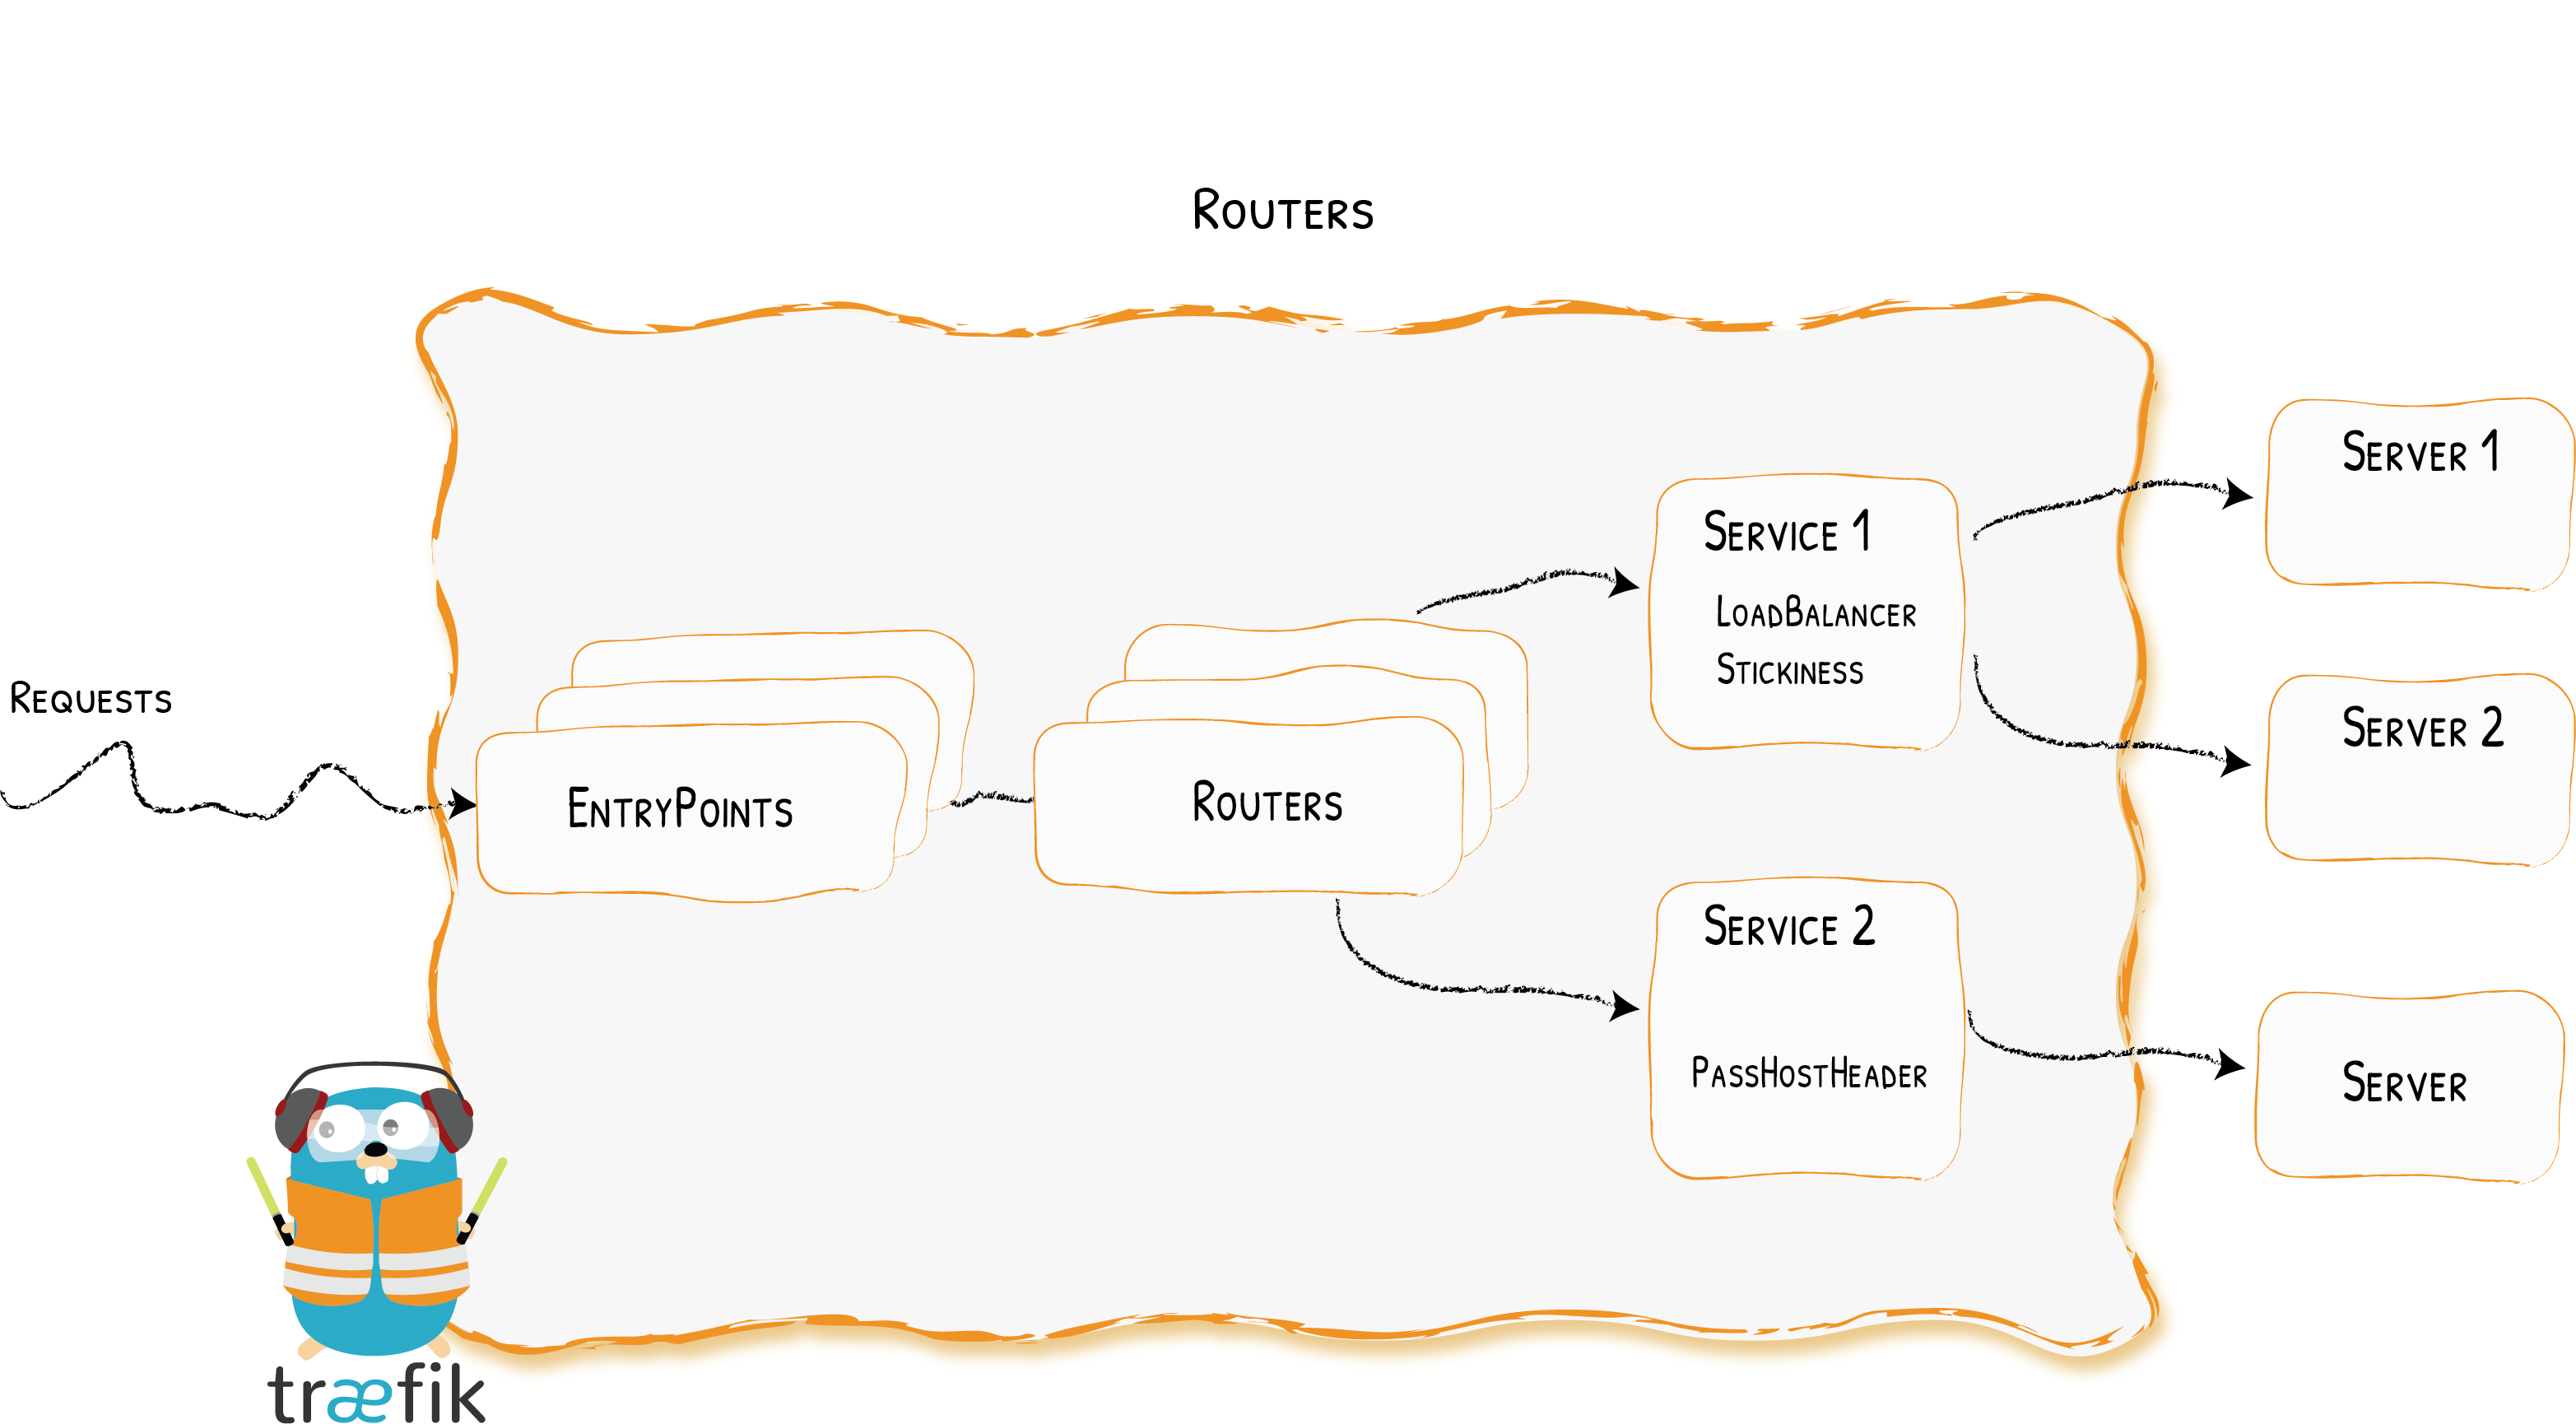
Entrypoints:监听请求端口
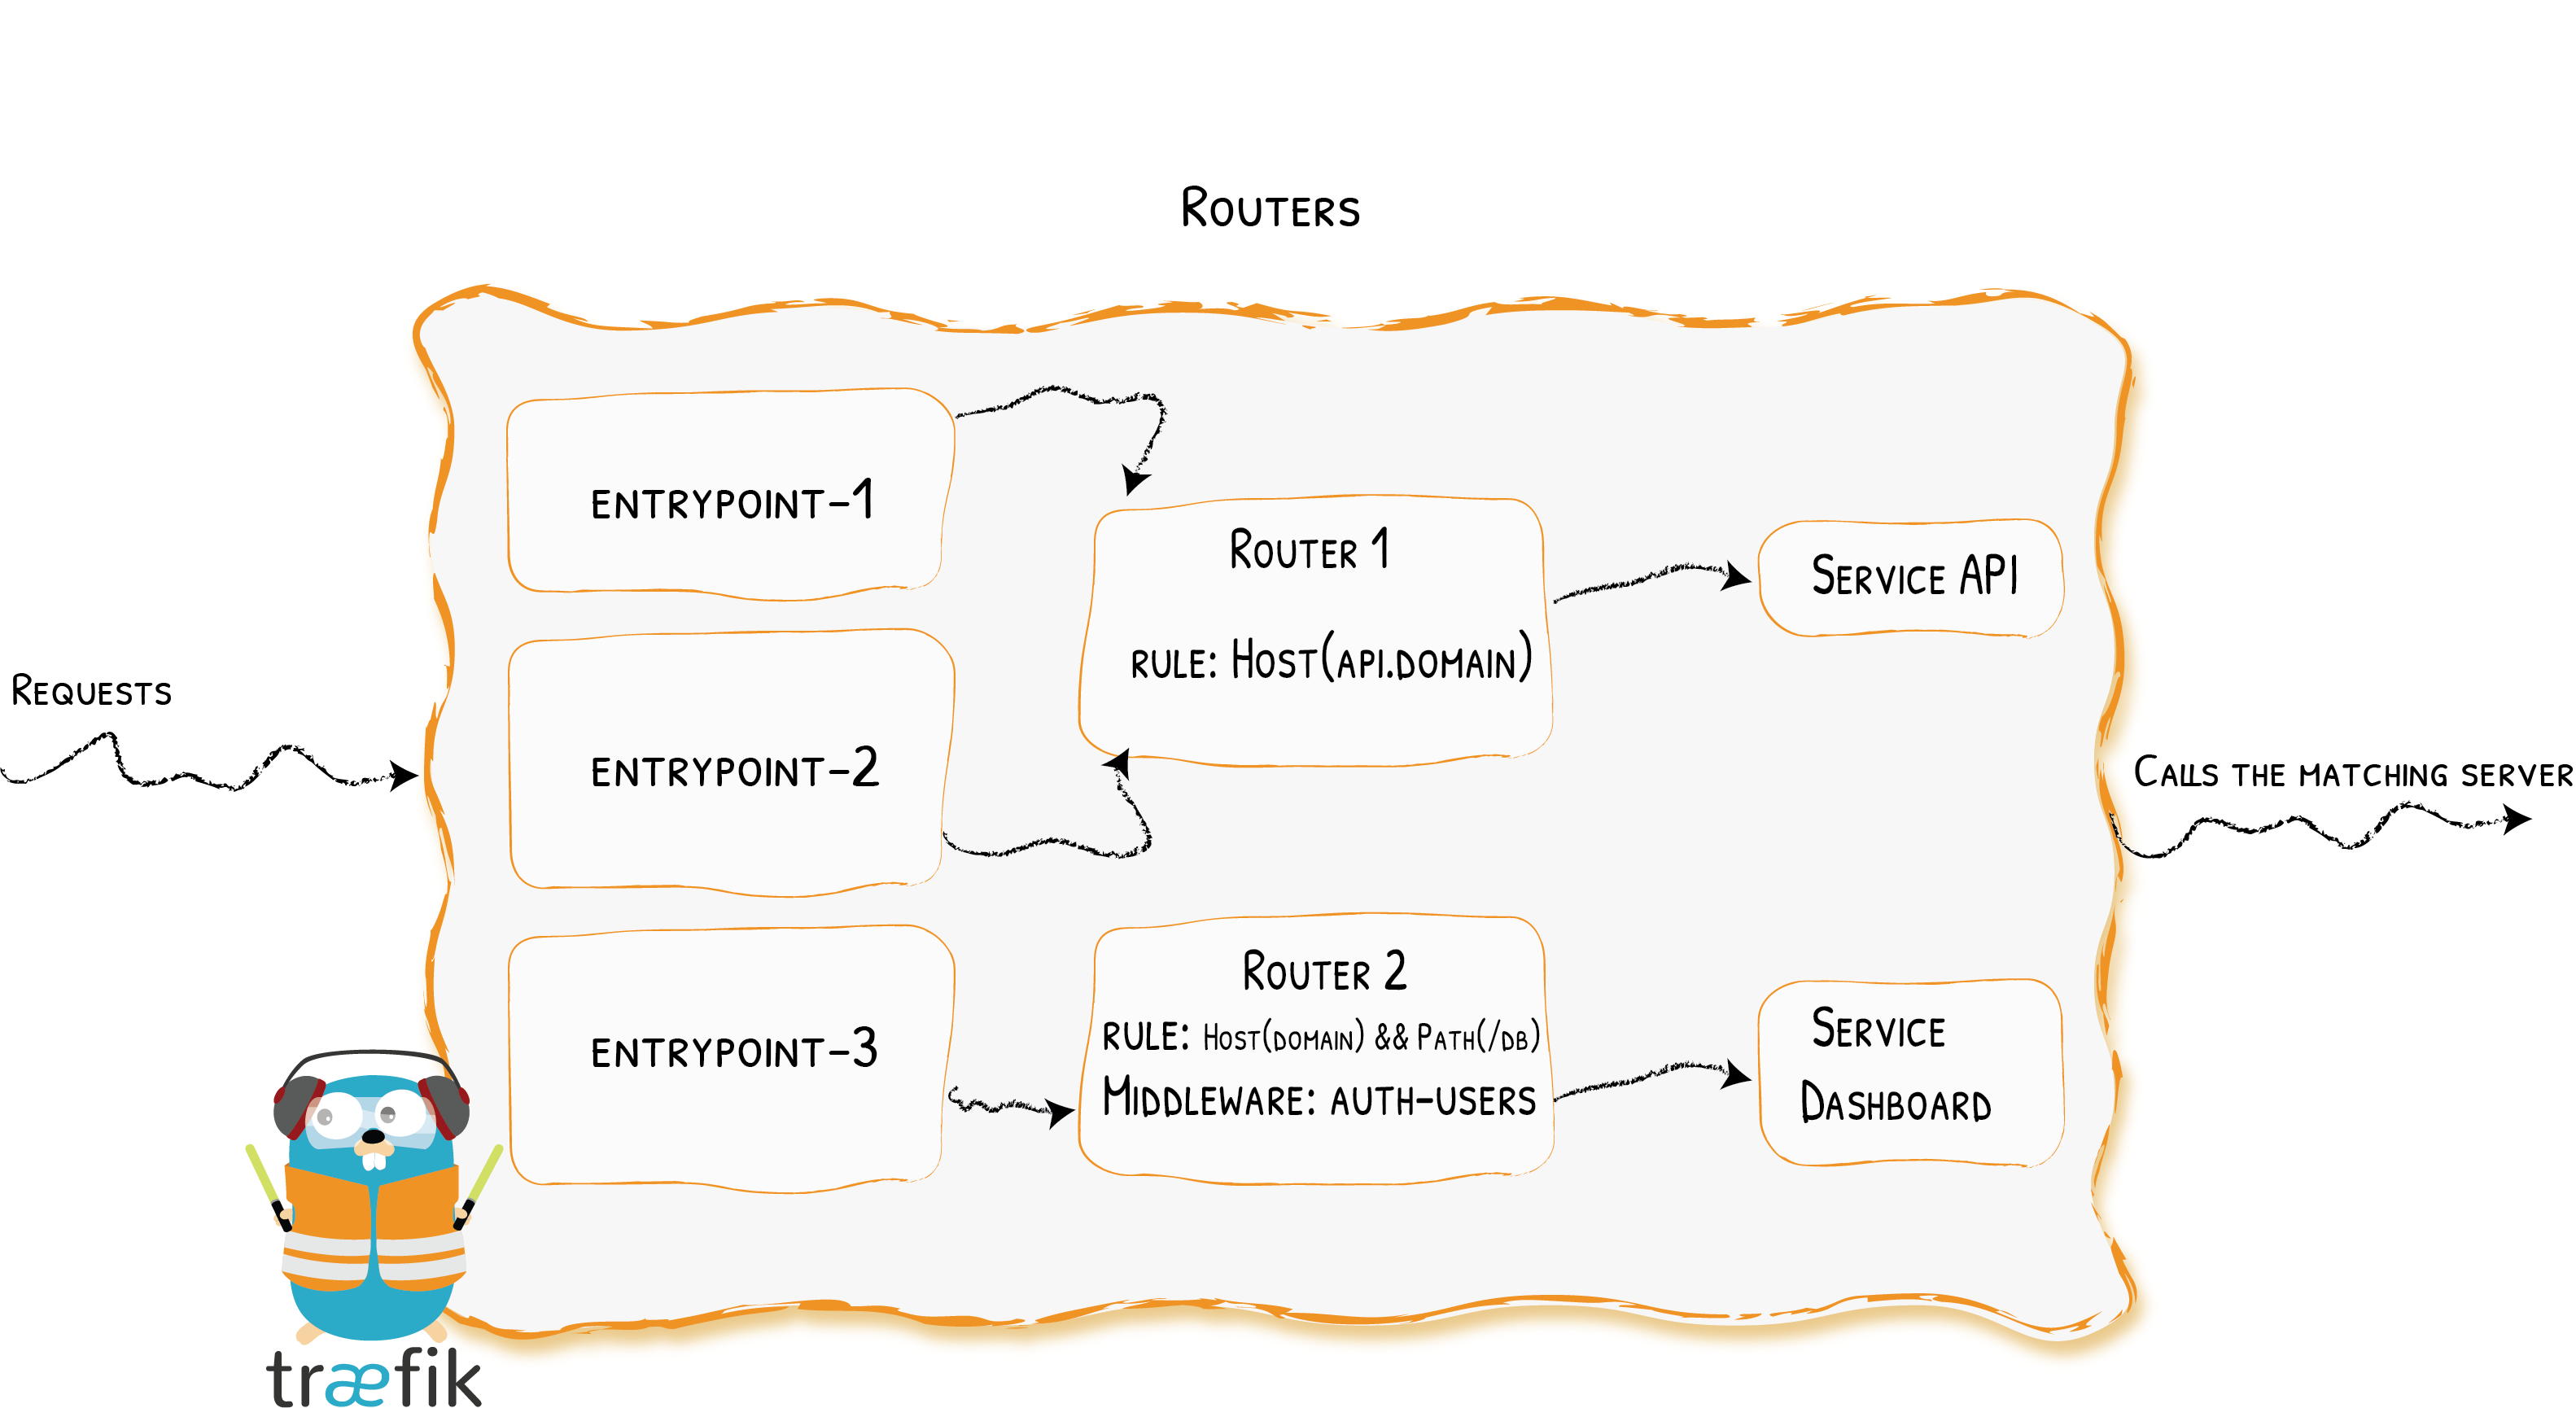
Routers:根据Rule分析请求(host, path, headers, ssl, …)后,将其连接到对应的服务进行处理。在这个过程中,可以使用中间件处理经过的请求。
Middlewares:将请求被转发到服务之前对请求做更新或调整
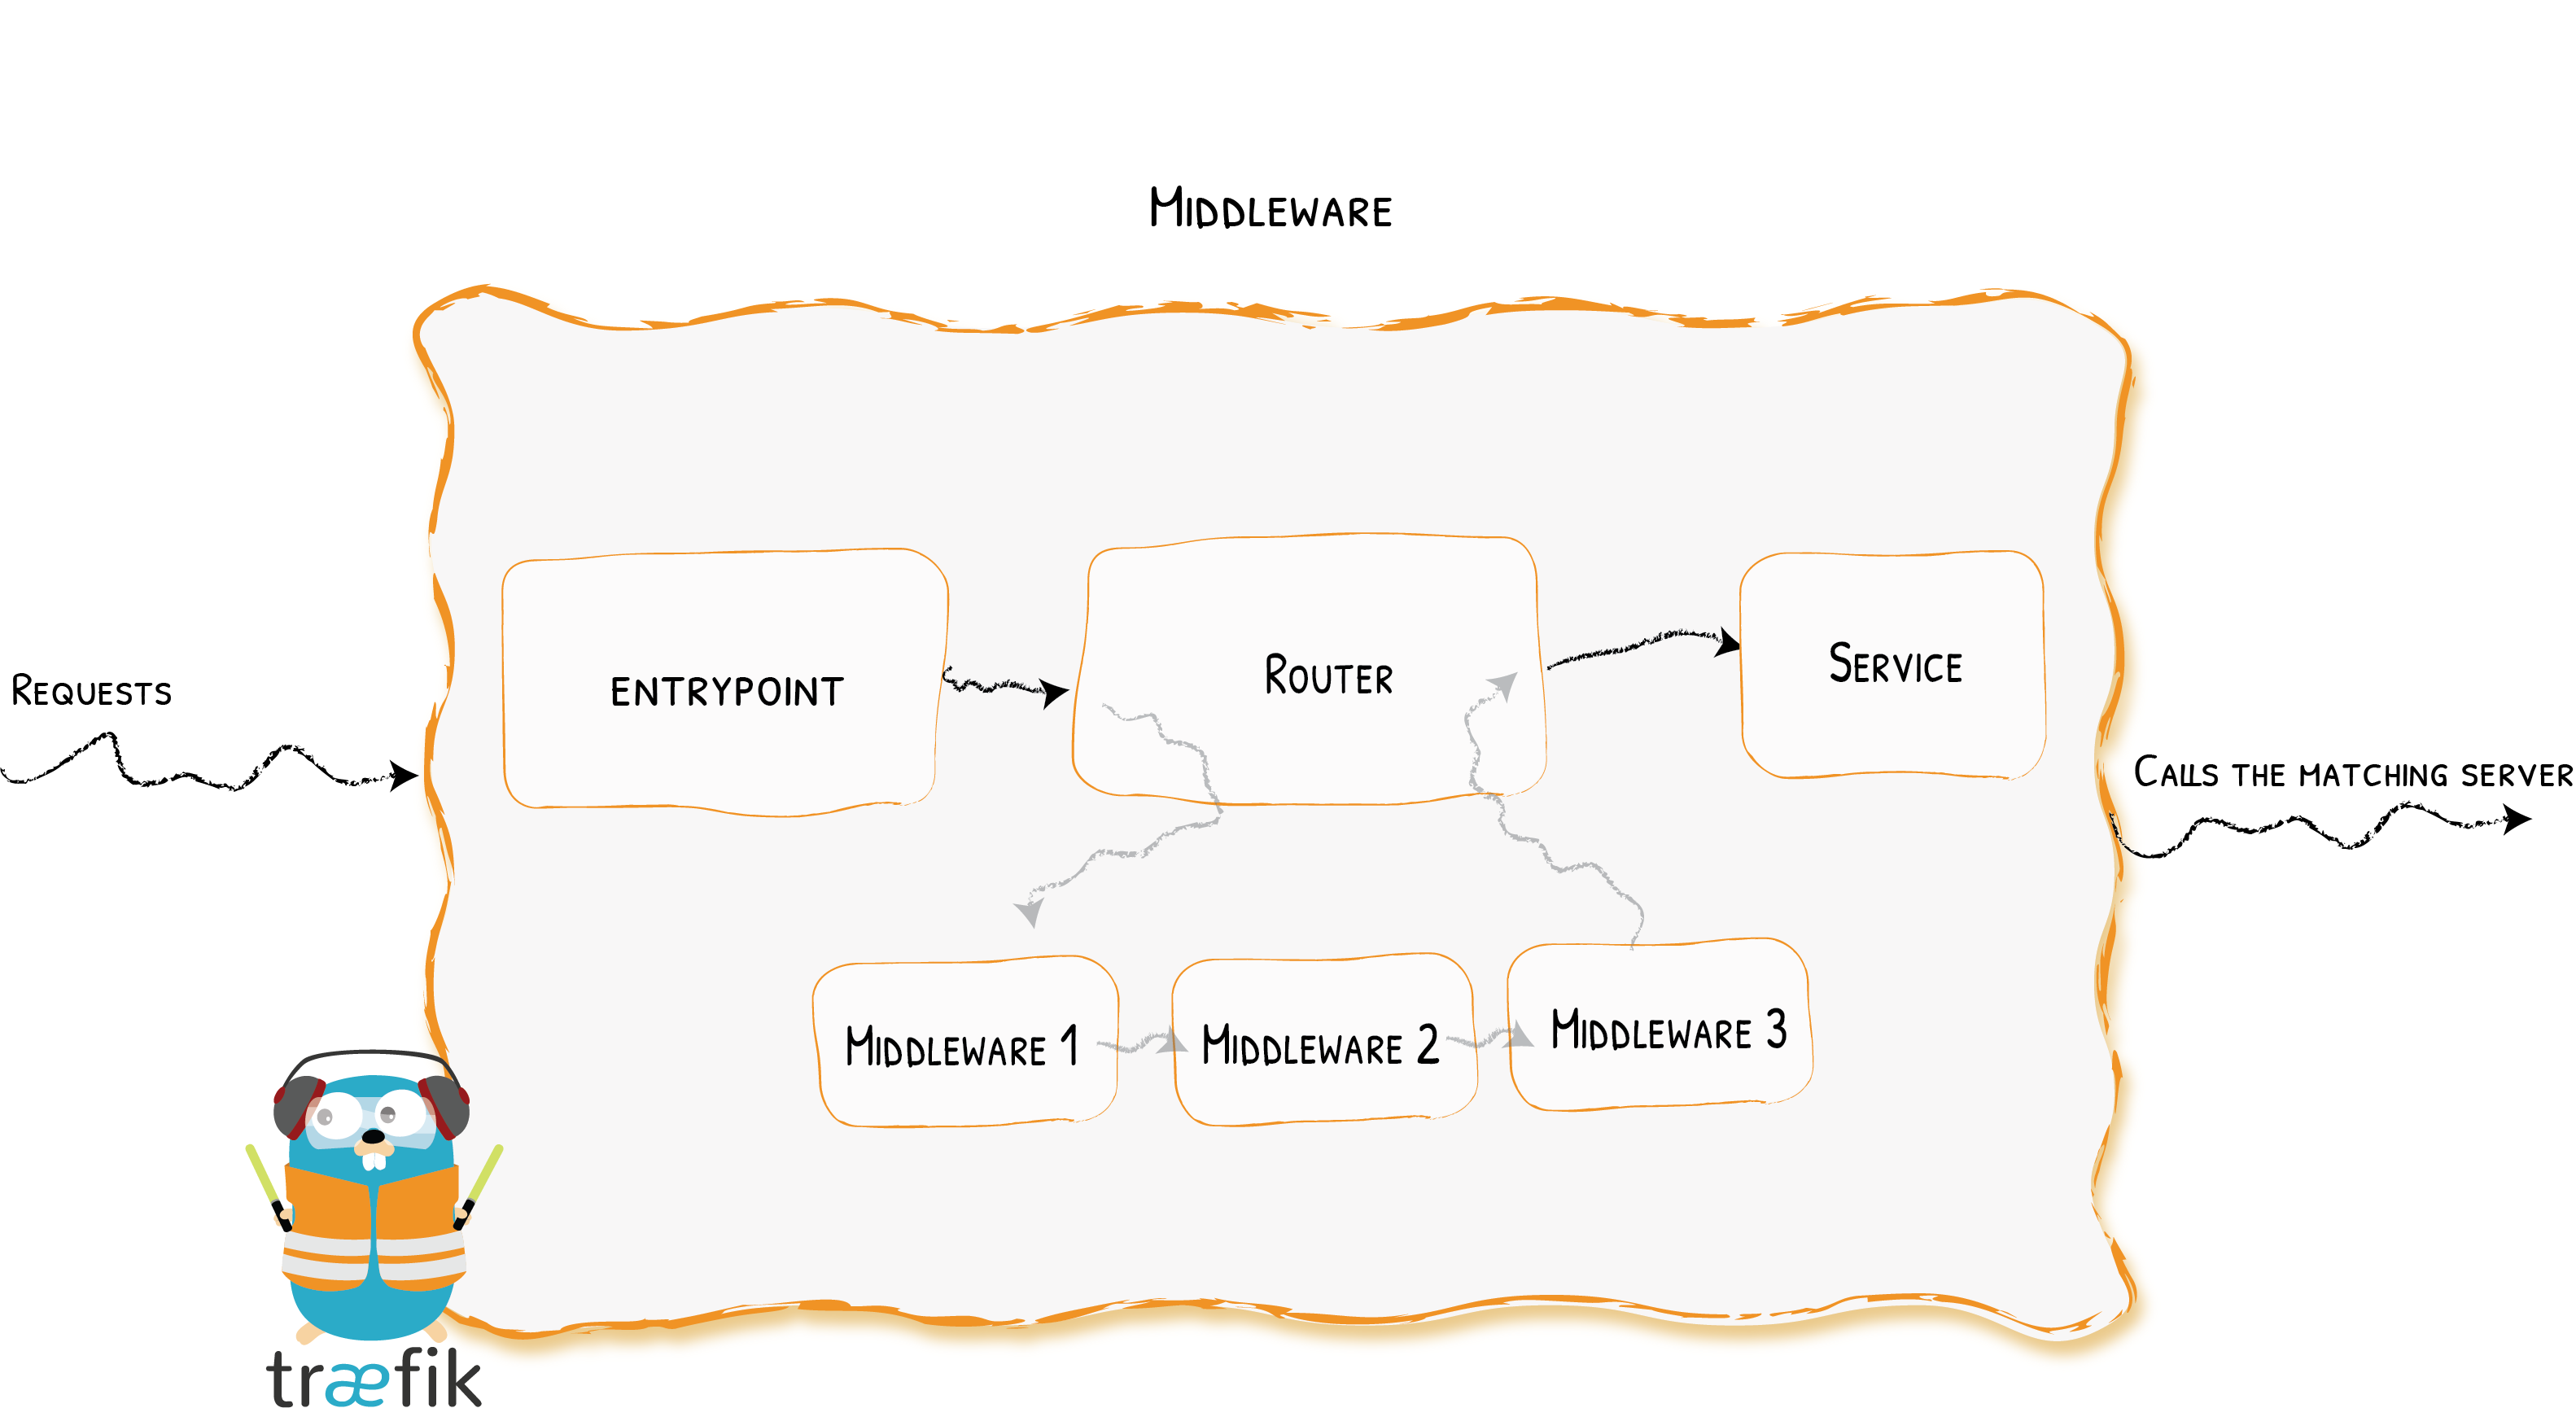
Services:负责配置请求如何到达实际服务,如负载均衡、传输控制协议、镜像流量等
Providers:基础架构组件,它可以是编排器、容器引擎、云提供者或者键值存储等。
Traefik 通过 Provider 的 API 来获取有关路由的信息,检测到变更则动态进行更新。
Traefik 实例启动时,在静态配置中定义了 Entrypoints 入口点(端口号)。路由器分析从入口点传入的请求,如果请求符合指定的规则,路由器会将请求经过中间件处理后再转发到对应的服务进行处理。
Traefik 的安装与启动
Traefik 默认会在以下路径查找 traefik.yml 或 traefik.toml 配置文件:
- /etc/traefik/
- $XDG_CONFIG_HOME/
- $HOME/.config/
- .
也可以指定配置文件进行启动:
traefik --configFile=foo/bar/myconfigfile.yml
Traefik 配置参考:
这里在 linux 下直接下载 v2 的二进制版本进行本地测试。
下载解压出二进制,并下载 demo 配置文件,默认配置的端口是 80,需要以 sudo 权限启动:
wget https://github.com/traefik/traefik/releases/download/v2.5.3/traefik_v2.5.3_linux_amd64.tar.gz
tar xzvf traefik_v2.5.3_linux_amd64.tar.gz
wget https://raw.githubusercontent.com/traefik/traefik/v2.5/traefik.sample.toml -O traefik.toml
修改 traefik.toml 静态配置:
开启 Dashboard 的 insecure 模式,修改配置文件中的 api 下的insecure = true 。
Traefik 启动后访问: http://localhost:8080/dashboard/#/ 可查看Dashboard

使用指定文件作为Provider的动态配置,直接追加配置:
[providers]
[providers.file]
    filename = "./dconf.toml"
新建动态配置文件 dconf.toml:
# http routing section
[http]
[http.routers]
    # Define a connection between requests and services
    [http.routers.myserver]
    rule = "Host(`myserver.local`)"
    # If the rule matches, applies the middleware
    middlewares = ["test-user"]
    # If the rule matches, forward to the myserver service (declared below)
    service = "myserver"

[http.middlewares]
    # Define an authentication mechanism
    [http.middlewares.test-user.basicAuth]
    # 注意这里的basic用户的密码必须使用htpasswd生成,不能直接填明文,这里对应的明文为asd
    users = ["asd:$apr1$KsluegO9$bbuP8Q1X3pLkx8XVRegse/"]

[http.services]
    # Define how to reach an existing service on our infrastructure
    [http.services.myserver.loadBalancer]
    [[http.services.myserver.loadBalancer.servers]]
        url = "http://localhost:8000"
上面的文件动态配置指定了 Host 为 myserver.local 的请求经过默认的 80 端口后,再由中间件进行 basic 认证,然后转发到 myserver 服务,myserver 服务的后端地址为:http://localhost:8000
启动Traefik实例:
sudo ./traefik
启动一个 8000 端口的服务模拟后端服务:
python -m SimpleHTTPServer
通过 curl 请求 Traefik 的 80 端口进行测试:
# 直接curl不满足rule,返回404
curl http://localhost:80
404 page not found

# 添加满足rule的host进行请求,中间件basic认证失败,返回401
curl -H 'host:myserver.local' http://localhost:80
401 Unauthorized

# 添加认证进行请求,成功将80端口的请求路由到了8000端口的服务进行处理并返回结果
curl -H 'host:myserver.local' -u 'asd:asd' http://localhost:80
<!DOCTYPE html PUBLIC "-//W3C//DTD HTML 3.2 Final//EN"><html>
<title>Directory listing for /</title>
<body>
<h2>Directory listing for /</h2>
<hr>
<ul>
<li><a href="dconf.toml">dconf.toml</a>
<li><a href="traefik">traefik</a>
<li><a href="traefik.toml">traefik.toml</a>
<li><a href="x.md">x.md</a>
</ul>
<hr>
</body>
</html>
使用 Golang 开发 Traefik 中间件插件
在开发自己的插件前,先了解一下 Traefik 插件的使用方式。
Traefik Pilot 插件的使用
通过 Dashboard 右上角使用 GitHub 账号授权连接 Traefik Pilot 可以对 Traefik 进行监控和管理,同时拥有公共插件中心。

Traefik 管理员可以从 Traefik Pilot 仪表板中的目录浏览插件并将其添加到实例中,每个插件的实际代码都存储并托管在公共 GitHub。
Traefik Pilot 每隔 30 分钟轮询一次 GitHub,以查找符合 Traefik 插件标准的仓库,并将其添加到目录中。
要被 Traefik Pilot 识别,插件的仓库必须满足以下标准:
- Github 代码仓库必须添加
traefik-plugin的topic。 - 必须存在有效的
.traefik.yml文件,格式参考文档 - 需要对插件打上版本号 tag
使用插件中心的插件时,需要修改静态和动态配置进行插件安装,实际是下载对应插件的源码到本地的plugin-storage路径下。
Traefik官方实现了 Yaegi 解释器,可以动态执行 Golang 源码,插件代码执行时由 Yaegi 动态加载执行,无需进行编译链接。
要激活插件,必须在 Traefik 实例的静态配置中声明它,插件在 Traefik 启动期间才会被解析加载,加载过程中出现错误,插件将被禁用,添加新插件和修改插件必须重启 Traefik 实例才能生效。
Traefik 启动时,会根据静态配置文件去 Pilot 插件中心去获取插件代码,对插件下载,校验,解压,然后加载插件源码通过 yaegi 来执行,先调用插件的 CreateConfig 函数再调用插件的 New 函数进行指定配置的插件实例创建。
在插件中心选择一个插件,有对应的安装文档,按执行进行即可。
这里安装 traefik-plugin-response-code-override 插件进行测试:
在静态配置中添加插件:
[experimental.plugins.traefik-plugin-response-code-override]
    moduleName = "github.com/Lepkem/traefik-plugin-response-code-override"
    version = "v0.0.3"
文件动态配置中添加中间件配置:
[http.middlewares.my-traefik-plugin-response-code-override]
    [http.middlewares.my-traefik-plugin-response-code-override.plugin]
    [http.middlewares.my-traefik-plugin-response-code-override.plugin.traefik-plugin-response-code-override]
        # 移除响应头里面的Date
        HeadersToRemove = ["Date"]
        RemoveBody = false
        [http.middlewares.my-traefik-plugin-response-code-override.plugin.traefik-plugin-response-code-override.Overrides]
        # 将200状态码替换为222
        200 = 222
文件动态配置中routers添加该中间件
middlewares = ["test-user", "my-traefik-plugin-response-code-override"]
重启 Traefik,curl 请求可以看到没有 Date 信息,200 也被替换为了 222:
curl -v -H 'host:myserver.local' -u 'asd:asd' http://localhost:80
*   Trying 127.0.0.1:80...
* TCP_NODELAY set
* Connected to localhost (127.0.0.1) port 80 (#0)
* Server auth using Basic with user 'asd'
> GET / HTTP/1.1
> Host:myserver.local
> Authorization: Basic YXNkOmFzZA==
> User-Agent: curl/7.68.0
> Accept: */*
>
* Mark bundle as not supporting multiuse
< HTTP/1.1 222 status code 222
< Content-Length: 376
< Content-Type: text/html; charset=UTF-8
< Server: SimpleHTTP/0.6 Python/2.7.18
< Date: Mon, 11 Oct 2021 09:41:25 GMT
<
<!DOCTYPE html PUBLIC "-//W3C//DTD HTML 3.2 Final//EN"><html>
<title>Directory listing for /</title>
<body>
<h2>Directory listing for /</h2>
<hr>
<ul>
<li><a href="dconf.toml">dconf.toml</a>
<li><a href="plugins-storage/">plugins-storage/</a>
<li><a href="traefik">traefik</a>
<li><a href="traefik.toml">traefik.toml</a>
<li><a href="x.md">x.md</a>
</ul>
<hr>
</body>
</html>
使用 Golang 开发 Traefik HTTP 中间件插件
Traefik 的 HTTP 中间件插件只是一个 Golang 包,提供一个 http.Handler 来执行请求和响应的特定处理。
插件包必须定义以下导出的 Go 对象:
type Config struct { ... } 结构体,字段任意。

func CreateConfig() *Config 函数。

func New(ctx context.Context, next http.Handler, config *Config, name string) (http.Handler, error) 函数。
如果插件有任何外部模块依赖项,必须将这些依赖包以 vendor 的形式放入当前插件的源码路径下以本地源码的方式进行使用,不支持 Go mod 的方式使用外部依赖。
本地开发模式
Traefik 提供了开发者模式在本地模式下使用插件,可用于临时测试未托管在 GitHub 上的插件。
Traefik 静态配置必须定 Golang 模块名称。这里需要注意的是,官方文档当前写的是 devPlugin 的配置方式,在 v2 上无法识别该字段,需要使用 plugins-local 的方式。
本地开发者模式的插件代码必须放在 ./plugins-local 目录中,该目录应位于运行 Traefik 二进制文件的进程的工作目录中。
插件的源代码按如下方式组织:
plugins-local
└── src
    └── github.com
        └── axiaoxin
            └── traefikplugindemo
                ├── .git
                ├── go.mod
                ├── go.sum
                ├── header_resp.go
                ├── header_resp_test.go
                ├── README.md
                ├── traefik_dynamic_conf.toml
                ├── traefik_static_conf.toml
                ├── .traefik.yml
                └── vendor
traefikplugindemo 是我实现的一个自定义中间件插件示例,功能是在返回header中添加 resp:xxx。
源码地址:https://github.com/axiaoxin/traefikplugindemo,
header_resp.go:
// Package traefikplugindemo Traefik插件示例
// 给请求响应头添加 resp:xxx
package traefikplugindemo

import (
    "context"
    "net/http"

    "github.com/iancoleman/strcase"
)

// Config the plugin configuration.
type Config struct {
    // resp header值的字符串风格:snake, camel
    ValueStrCase string
    // resp header的默认值
    DefaultValue string
}

// CreateConfig creates the default plugin configuration.
func CreateConfig() *Config {
    return &Config{
        ValueStrCase: "",
        DefaultValue: "",
    }
}

// HeaderResp a plugin.
type HeaderResp struct {
    next http.Handler
    name string
    conf *Config
}

// New created a new plugin.
func New(ctx context.Context, next http.Handler, config *Config, name string) (http.Handler, error) {
    return &HeaderResp{
        next: next,
        name: name,
        conf: config,
    }, nil
}

func (h *HeaderResp) ServeHTTP(rw http.ResponseWriter, req *http.Request) {
    // 默认返回头 resp:axiaoxin
    val := h.conf.DefaultValue
    // 如果请求头带有 x-resp,则返回头 resp:x-resp的值
    if customVal := req.Header.Get("x-resp"); customVal != "" {
        val = customVal
    }

    // 使用外部依赖包,发布插件时需要采用vendor模式
    switch h.conf.ValueStrCase {
    case "camel":
        val = strcase.ToCamel(val)
    case "snake":
        val = strcase.ToSnake(val)
    }

    // 设置返回头
    rw.Header().Add("resp", val)

    // 继续后续请求处理
    h.next.ServeHTTP(rw, req)
}
写好代码后,修改静态配置,添加本地插件:
[experimental.localPlugins.axiaoxin-traefik-plugin-demo]
    moduleName = "github.com/axiaoxin/traefikplugindemo"
动态配置添加中间件,命名为 axiaoxin-middleware:
middlewares = ["test-user", "my-traefik-plugin-response-code-override", "axiaoxin-middleware"]
动态配置中添加中间件的配置,配置项与 Config 结构体中的字段一一对应:
[http.middlewares.axiaoxin-middleware.plugin.axiaoxin-traefik-plugin-demo]
    ValueStrCase = "snake"
    DefaultValue = "axiaoxin"
重启 Traefik,curl 请求中通过 x-resp 设置自定义 resp 的值:
curl -v -H 'host:myserver.local' -u 'asd:asd' -H 'x-resp:axiaxoin test demo' http://localhost:80
*   Trying 127.0.0.1:80...
* TCP_NODELAY set
* Connected to localhost (127.0.0.1) port 80 (#0)
* Server auth using Basic with user 'asd'
> GET / HTTP/1.1
> Host:myserver.local
> Authorization: Basic YXNkOmFzZA==
> User-Agent: curl/7.68.0
> Accept: */*
> x-resp:axiaxoin test demo
>
* Mark bundle as not supporting multiuse
< HTTP/1.1 502 Bad Gateway
< Resp: axiaxoin_test_demo
< Date: Tue, 12 Oct 2021 04:10:50 GMT
< Content-Length: 11
< Content-Type: text/plain; charset=utf-8
<
将插件发布到 Traefik Pilot
本地测试通过,使用 go mod vendor 将依赖打包到 vendor 目录,再打上 tag 提交到 github,并在 github 仓库的 about 设置添加 traefik-plugin 的 topic,等一段时间插件就会被同步到 Traefik Pilot 的插件中心,接下来你就能安装使用了,如图所示: